Choosing among solar charge controllers for beginners can feel complicated, especially when product listings mix PWM and MPPT technology with different voltage, amperage, and battery claims.
This roundup focuses on practical options for small RV, boat, backup-power, and off-grid projects, with attention to setup simplicity, battery compatibility, monitoring, and value.
Best 10 Solar Charge Controllers for Beginners Picks for 2026
Best Smart MPPT Pick
Victron Energy SmartSolar MPPT 75V 15A

- Efficient MPPT charging for 12V/24V systems
- Bluetooth app with live data and history
- Configurable low-voltage load disconnect
Best For: Compact systems needing app monitoring and efficient charging
Best Beginner-Friendly 12V Value
12V 20A PWM Controller with LCD
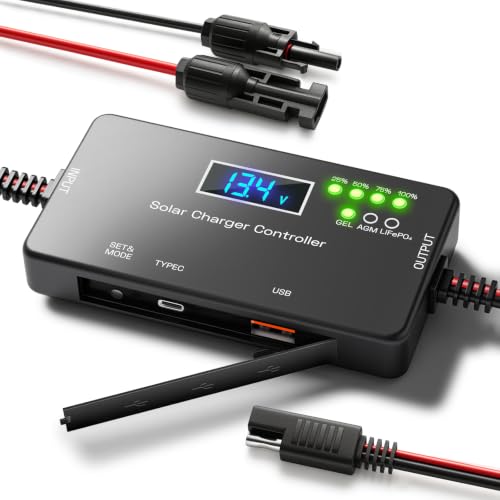
- Works with 12V LiFePO4, AGM, and Gel batteries
- LCD shows voltage and charge level
- USB-C PD and USB QC3.0 charging ports
Best For: Simple 12V RV, boat, shed, and outdoor systems
Best for Larger Systems
Victron Energy SmartSolar MPPT 100V 50A

- 50A MPPT capacity for larger arrays
- Bluetooth monitoring and configuration
- Supports synchronized multi-controller charging
Best For: Expandable 12V/24V systems with higher charging demands
Best Basic Lead-Acid Controller
Upgraded 30A PWM LCD Controller

- Automatic 12V/24V adaptation
- LCD with adjustable load timing
- Designed for lead-acid batteries only
Best For: Basic lead-acid systems needing simple monitoring and USB output
Best Compact MPPT
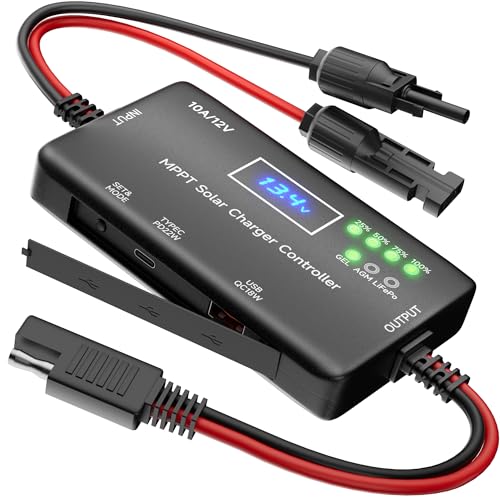
- Compact 12V MPPT design
- LCD, LED, USB, and Type-C outputs
- Supports AGM, gel, lead-acid, and LiFePO4
Best For: Compact 12V portable solar systems
Best Connected PWM
ECO-WORTHY 30A Bluetooth Controller

- Supports 12V and 24V systems
- Bluetooth app integration and LCD
- Dual USB outputs with 30A controller rating
Best For: Beginner systems needing remote monitoring
Best Weather-Ready Option

- IP67 waterproof compact design
- MPPT charging for 12V batteries
- Color indicators and SAE connection
Best For: Portable or exposed 12V installations
Best Adjustable LCD Option

- LCD display with adjustable charging parameters
- Automatically supports 12V and 24V systems
- Protection features and dual USB outputs
Best For: Beginners using adjustable 12V or 24V lead-acid systems
Best Outdoor Compact Pick
SOLPERK 10A Waterproof Controller

- IP67 waterproof housing for outdoor use
- Automatic 12V/24V identification
- LED status indicators and SAE installation
Best For: Small outdoor systems with AGM, GEL, or flooded batteries
Best Smart MPPT Pick – Victron Energy SmartSolar MPPT 75V 15A
For beginners comparing solar charge controllers for beginners, the Victron Energy SmartSolar MPPT 75/15 is a strong choice when efficient charging and app-based monitoring matter. Its MPPT design is intended to maximize available solar power, including when panels are partly shaded, while supporting 12V and 24V systems.
Best For: Beginners building a compact 12V or 24V system who want Bluetooth monitoring and more efficient MPPT charging.
Pros:
- MPPT tracking helps optimize available panel power, including in partial shade.
- VictronConnect provides real-time data, performance history, settings, firmware updates, and alarms.
- Supports synchronized operation with multiple SmartSolar controllers.
- Configurable load output can disconnect loads when battery voltage is too low.
Cons:
- Its 15A rating is intended for smaller systems rather than higher-current installations.
- The unit has only an LED or minimal onboard display, so detailed monitoring uses the app.
This is a beginner-friendly premium option for users who want room to learn and monitor their system digitally. Confirm that your panel and battery setup stays within the controller’s 75V and 15A limits.
Best Beginner-Friendly 12V Value – 12V 20A PWM Controller with LCD
This 12V PWM controller is a straightforward entry point for solar charge controllers for beginners, especially for RVs, boats, sheds, and outdoor equipment. The quick-connect wiring, LCD status screen, and support for LiFePO4, AGM, and Gel batteries make basic setup easier.
Best For: Beginners with a 12V system who want simple wiring, an LCD battery readout, and built-in USB charging.
Pros:
- Supports 12V LiFePO4, AGM, and Gel batteries.
- LCD shows battery voltage and charge levels at 25%, 50%, 75%, and 100%.
- Quick-connect ports are designed for a simple installation.
- Includes 22W USB-C PD and 18W USB QC3.0 outputs for compatible devices.
Cons:
- It is for 12V systems only and is not suitable for 24V or 36V batteries.
- As a PWM controller, it does not offer the MPPT tracking described for the Victron models.
- The supplied notes specify panel support up to 300W, so larger arrays need another controller.
Its clear display and practical charging ports make this a convenient starter controller for modest 12V setups. Follow the stated connection order: connect the battery first, then the solar panel.
Best for Larger Systems – Victron Energy SmartSolar MPPT 100V 50A
For beginners planning a higher-capacity installation, the Victron Energy SmartSolar MPPT 100/50 offers the same app-connected MPPT approach in a 50A model. It supports 12V and 24V systems and is designed to extract more available power from panels while helping manage battery charging.
Best For: Beginners who expect a larger 12V or 24V solar array and want scalable monitoring through Bluetooth.
Pros:
- 50A capacity is suited to larger systems than a compact 15A controller.
- MPPT tracking is designed to maximize power output, including with partial panel shade.
- VictronConnect offers real-time data, 30-day history, configuration, firmware updates, and alarms.
- Multiple units can synchronize charging stages for system-wide optimization.
Cons:
- The larger, heavier enclosure may be excessive for a small beginner setup.
- There is no onboard display, so detailed status information requires the app.
- Users must size the system carefully within the controller’s 100V and 50A limits.
This is a capable choice when starting with expansion in mind rather than buying the smallest controller available. Its higher capacity can simplify growth, but verify array voltage, charging current, and battery compatibility before installation.
Best Basic Lead-Acid Controller – Upgraded 30A PWM LCD Controller
This 30A PWM model is a practical option for solar charge controllers for beginners who are using lead-acid batteries and want automatic voltage recognition. Its LCD, dual USB output, adjustable load timing, and built-in protections provide useful controls for basic home, commercial, or outdoor systems.
Best For: Beginners using open, sealed, or gel lead-acid batteries in a 12V or 24V system.
Pros:
- Automatically adapts to 12V or 24V systems.
- LCD displays operating status and data, with adjustable load timing.
- Includes 5V/2.5A dual USB outputs for charging devices.
- Provides protection against overcurrent, short circuit, reverse connection, low voltage, and overcharge.
Cons:
- It is explicitly not suitable for lithium or nickel-metal hydride batteries.
- As a PWM controller, it lacks the MPPT optimization offered by the Victron controllers.
- The instructions require connecting the battery before the solar panel and installing on a ventilated, flat surface.
For a conventional lead-acid setup, this controller keeps the feature set accessible without requiring manual 12V/24V selection. Its battery limitation is important, so choose a different model if your system uses LiFePO4.
Best Compact MPPT – SUNAPEX 12V 10A Controller
For beginners choosing solar charge controllers for beginners, the SUNAPEX is a compact 12V MPPT option with a straightforward display and plug-and-play SAE connectors. It supports several common battery types, but careful wiring is essential: connect the solar panel first, then the battery, with correct polarity.
Best For: Beginners building compact 12V portable solar systems with AGM, gel, lead-acid, or LiFePO4 batteries.
Pros:
- MPPT charging with four-stage charging for battery maintenance.
- LCD and LED indicators show voltage, current, charge level, and status.
- USB and Type-C outputs can charge compatible devices.
- Protection features include overcharge, reverse polarity, short-circuit, and over-temperature safeguards.
Cons:
- Designed only for 12V batteries and not 24V or 36V packs.
- Not compatible with solar panels that already have an integrated controller.
- Correct polarity is required because it does not include a polarity converter.
The SUNAPEX offers useful beginner feedback and device charging in a small package. Its strict 12V limitation makes it best suited to clearly defined, smaller systems rather than setups intended for future voltage expansion.
Best Connected PWM – ECO-WORTHY 30A Bluetooth Controller
The ECO-WORTHY is a practical introduction to solar charge controllers for beginners who want a 12V or 24V system with app-based monitoring. Its LCD and Bluetooth connectivity add convenience, while the 30A rating and dual USB outputs suit larger basic setups.
Best For: Beginners who want Bluetooth monitoring for 12V or 24V lead-acid, gel, or LiFePO4 battery systems.
Pros:
- Works with both 12V and 24V systems.
- Built-in Bluetooth supports app integration and monitoring from up to 98 feet in open conditions.
- LCD displays system data and supports mode and parameter configuration.
- Includes dual USB outputs rated up to 5V/2.5A maximum.
Cons:
- Uses PWM charging rather than MPPT.
- Requires a specific wiring sequence: battery first, then solar panel, then load.
- Can heat during operation and should be installed on a flat, well-ventilated surface.
This controller stands out for accessible monitoring and broader system-voltage compatibility. Beginners should follow the installation order closely and allow adequate ventilation, especially when the controller is working under load.
Best Weather-Ready Option – SOLPERK 12V 10A MPPT
For beginners comparing solar charge controllers for beginners, the SOLPERK combines a compact 12V MPPT design with a waterproof IP67 build. Its three indicator lights keep status checks simple, while the SAE port makes basic installation approachable.
Best For: Portable or exposed 12V solar setups using AGM, lead-acid, gel, deep-cycle, sealed, flooded, or LiFePO4 batteries.
Pros:
- MPPT design is described as up to 30% more efficient than PWM controllers.
- IP67 waterproof construction suits installations needing added weather resistance.
- Compact, lightweight design with an SAE plug-and-play port.
- Includes under-voltage, over-voltage, overload, short-circuit, and reverse-connection protection.
Cons:
- Designed for 12V batteries only.
- Uses indicator lights rather than the more detailed LCD and current readout found on some alternatives.
- Beginners must follow the manual’s connection instructions.
The SOLPERK is a simple choice when compact size and water resistance matter more than advanced display data. Its broad 12V battery compatibility and clear color indicators make routine status checks easy.
Best Adjustable LCD Option – 30A PWM Controller
For beginners comparing solar charge controllers for beginners, this 30A PWM model offers a clear LCD interface and adjustable settings without requiring a complicated system. It automatically supports 12V or 24V setups and is designed for lead-acid batteries, including AGM, GEL, and open types.
Best For: Beginners building a customizable 12V or 24V lead-acid battery system.
Pros:
- LCD display makes system status and settings easier to read.
- Automatically supports 12V and 24V systems.
- Adjustable float, reconnect, and stop-discharge voltage settings.
- Includes overcurrent, short-circuit, reverse-connection, and open-circuit protection.
Cons:
- Not compatible with lithium batteries.
- Requires wiring in the correct sequence: battery, solar panel, then load.
This is a practical choice when you want beginner-friendly monitoring plus more control over charging parameters. Its 30A rating and dual USB outputs add flexibility, provided your system uses compatible lead-acid batteries.
Best for 12V Gadgets – 20A PWM Controller
This 20A controller is a straightforward pick among solar charge controllers for beginners who are building a 12V RV, boat, shed, or camping setup. Its LCD shows charging information, while USB-C and USB-A ports can power compatible devices directly.
Best For: 12V off-grid users who want fast device charging and simple SAE-connector installation.
Pros:
- Supports Gel, AGM, and LiFePO4 12V batteries.
- LCD displays PV voltage, battery voltage, and charge level.
- Provides 22W USB-C PD and 18W USB charging.
- SAE connectors are designed for quick installation.
Cons:
- Works only with 12V systems, not 24V or 36V batteries.
- Maximum PV open-circuit voltage is 30V.
Choose this model if convenient USB charging is a priority and your system is strictly 12V. The battery compatibility is broader than some basic PWM controllers, but the voltage limitation should be checked before purchase.
Best Outdoor Compact Pick – SOLPERK 10A Waterproof Controller
For beginners seeking solar charge controllers for beginners that can handle outdoor installation, this compact SOLPERK model offers an IP67 waterproof enclosure and automatic 12V/24V identification. Its LED indicators provide a simple way to check charging, battery, and load status.
Best For: Small outdoor RV, boat, or vehicle systems using compatible deep-cycle lead-acid batteries.
Pros:
- IP67 waterproof design suits outdoor use.
- Automatically identifies 12V or 24V systems.
- Three-stage PWM charging and multiple protection functions.
- SAE port and included manual support simple installation.
Cons:
- 10A maximum current is lower than the other listed controllers.
- Compatible battery types listed are AGM, GEL, and flooded batteries, not lithium.
- LED indicators provide less detailed information than an LCD display.
This controller makes sense for smaller outdoor installations where weather resistance and uncomplicated status lights matter most. Confirm that your panel output stays within the stated 150W maximum for 12V or 300W maximum for 24V systems.
How We Picked These Solar Charge Controllers for Beginners
We prioritized controllers that clearly state their supported battery voltage, charging current, and battery chemistry. The selection includes simple PWM models for budget-conscious setups, MPPT controllers for better energy harvesting, and options with LCD screens, USB outputs, Bluetooth, or waterproof housings.
We also considered how suitable each controller is for a first installation. Clear status information, automatic 12V/24V detection, adjustable settings, and protection features can reduce setup errors. Before buying, verify the product documentation for maximum solar input voltage, battery type support, wire requirements, and load limits.
Quick Comparison
| Type | Best For | Main Advantage | Watch For |
|---|---|---|---|
| MPPT | Higher-efficiency systems | Extracts more usable energy, especially in changing conditions | Usually costs more and requires careful voltage matching |
| PWM | Small, simple, budget systems | Affordable and easy to install | Generally less efficient than MPPT |
| LCD-equipped | Users who want local status checks | Shows charging and battery information at the controller | Display features vary by model |
| Bluetooth-enabled | Remote monitoring | Convenient access to system data | App compatibility and range matter |
Key Buying Factors for Solar Charge Controllers for Beginners
Match the Battery Voltage and Chemistry
Confirm whether the controller supports your battery’s nominal voltage, such as 12V or 24V. Lithium iron phosphate batteries require a controller with an appropriate LiFePO4 profile or adjustable charging parameters. AGM and gel batteries also need suitable charging settings.
Choose the Right Charging Current
A controller’s amp rating limits how much charging current it can manage. Select a rating above the expected solar-panel output, while staying within the battery manufacturer’s recommended charge rate. A 10A controller suits smaller panels; 20A and 30A models accommodate larger systems, while 50A units are intended for substantially higher output.
Understand PWM Versus MPPT
PWM is often adequate for compact systems where price and simplicity matter. MPPT generally performs better when panel voltage is higher than battery voltage, in colder conditions, or when maximizing available solar energy is important. Never exceed the controller’s maximum PV voltage.
Check Installation and Protection Features
Look for reverse-polarity, overcharge, overcurrent, short-circuit, and overheating protection. Waterproof construction can be valuable in exposed RV, marine, or outdoor installations, but it does not replace proper cable glands, fusing, and a protected mounting location.
Who Should Buy Which Solar Charge Controllers for Beginners?
- First-time, small 12V users: Choose a clearly labeled 10A or 20A PWM controller with an LCD if you want simple local monitoring.
- Users prioritizing efficiency: Consider an MPPT model, particularly when panel voltage is noticeably higher than battery voltage or available sunlight is limited.
- RV and boat owners: A waterproof controller or one with robust protection features may be the most practical choice.
- Remote-monitoring fans: Bluetooth is useful when you want to check charging data without opening a compartment, provided the app and device support meet your needs.
- Larger 12V/24V systems: Select a higher-current controller only after calculating panel output, battery capacity, wire sizing, and fuse requirements.
For every setup, install a properly rated fuse near the battery, use correctly sized wiring, follow the manufacturer’s connection sequence, and confirm polarity before powering the controller.